Wednesday, February 24, 2010

Fuzzy Office Chair

Listening to the great Incredible Kidda Band.  How come I just found out about these guys?  They've been around since the 1970's!

Ok, I also just found out one of the cats, one with white fur in particular, is as crazy about our newly recovered office chair as we are.  Here is the pictoral blow by blow of how I did it.


First, you take a chair.  We have this really great office chair we wanted to keep but the teal color left us cold.  I hate teal unless it's on one of the San Jose Sharks.

Prying off the back and seat cushions took a little brute force. I wasn't sure how the cushions were attached and destroying them in the removal process could have resulted in having to scrap the whole project.  Luckily I fairly easily detached the cushions from the chair and saw how very cleverly the cushions were attached in the first place with a hook-on thing and a snap-on thing.  The hook-on thing slides into a hole in the chair frame, and then the snap-on thing snaps the cushion into place.  Very sturdy, the cushions ain't goin' anywhere!


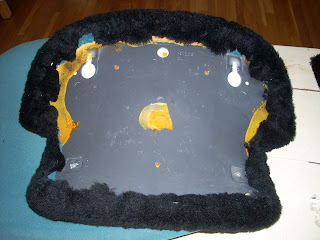
Here is the naked chair frame.  I gave it nice rub down with a wet cloth to get off any old dirt and crud that had been lurking under the cushions.


Since this is going in our black room, well, black would be a good color for the chair.  I had some fake black fur left over from an old aborted project and thought this would be perfect for the chair.  I was so right!  Covering a chair seat is about one of the easiest projects around.  Usually all you need is a staple gun and fabric.  Lay the cushion on the fabric and staple away while pulling the fabric tight so you don't have wrinkles.  Then trim the edges with scissors.


I covered both the back and seat cushions.  Putting them back on the chair frame was really easy with the hook and snap.

And look at this chair!  I am so happy with it, it's very comfy and stylish, and one of a kind I might add. And it only took about 30 minutes to do the whole damn thing! Nice!


Monday, February 22, 2010

Drape and Cellular Shade Install

The drapes and cellular shades for our office are up.  Here is the thrilling photo documentation of the install.

The drapery rods were re-used from before the re-do.  We didn't feel like fooling around with a level so Dan and I simply eyeballed them to make sure they were straight.  I used some of those plastic anchor and screw things to hang the brackets.  They enable the rods to hold up to 50 lbs. Not that they need to hold that much weight but you never know when one of the bad cats might think it a good idea to a half pike off the drapes. I worn you cats now....don't even think about it.


We picked really simple inexpensive white 100% cotton drapes to help lighten up super dark walls.  And they can be thrown in the washing machine when they need it.

Drapes!


Here are the cellular shades in their boxes that the mail guy dropped off.  We ordered these from jcpenney.com because they cost a hell of a lot less then Levolar or Bali blinds.  Man, those things are tres cher.  And, we were able to order these in exactly the size we wanted.


I was a little worried about the difficulty of installing these blinds because they are the top-down/bottom-up variety.  No problem though, it was really easy, no more difficult than installing a mini blind.  But, it is kind of hard to hold the electric drill up over your head when your arms are fried from the many push ups and pull ups cranked out earlier in the day.

Here is all the stuff out of the box.  I hope you find it as interesting as I do.


First thing to do was install the brackets that hold the blind so I started by measuring.  We wanted an inside mount, meaning the blind will fit into the window frame instead of outside of it.  Each blind has 2 brackets that had to be screwed into the window frame.  For each bracket I measured 3 inches in from the side, and one inch in from the front of the window frame.  Than I marked the screw holes with a pencil and used the drill to drill the holes.


Here is one of the brackets ready to go.


Four windows, 8 brackets and 32 screws later, I popped the blinds into the brackets, and voila!  I love them, especially the up/down feature these have.  And they still let a lot of light in when they're closed all the way. Pretty great. 


Plastic handles to lift and lower the blind are included and snap on to the blind. 


We are pretty happy with the blinds and drapes.  It's kind of sad, though...I used to spend my money on clothes and vacations.

Monday, February 8, 2010

First Peek: The Office Exposed


I am happy to report that yesterday I finally finished ALL the painting in our office!  This includes all the extra sanding, painting of all the base cove that Dan put in last weekend, all the second coats of paint on everything, all the touch-ups of all those paint brush slips.  It seems to have taken forever and I am ecstatic that it is done!  Now the real fun begins...we get to add all of our neat stuff to the room.

Here are some pics of our lovely black and white office.  Today when I get off work I'm going to put up the curtain rods and hang the drapes.  I'm so excited!  I know, I'm weird.
- punk rock martha stewart -